- Log In
- Support
- Company
- Contact Us
- Live answers @ 1-888-532-4794
Feature Spotlight – Learn More About Setting Holidays
The holidays are upon us, which means it’s time for stuffing, shopping and Santa. As you spend more time with friends and family, your business may need to notify anyone calling in that you are not available. With our easy to use tools, we are going to show you two different ways that you can accomplish this in just a few minutes. In this feature spotlight we’ll discuss:
- What are Holidays
- How to Create a Holiday Set
- How to Apply a Holiday Set to your Business Hours
- How to Incorporate a Holiday Set to your Greeting
- How to Incorporate a Holiday Set to your Closing
- How to Change your Script Based on a Holiday
What are Holidays?
Holidays are days where our system considers your office closed. When associated with business hours, a holiday will override your normal scheduled business hours. For example, if you list Christmas, December 25th as a holiday, and if that holiday falls on a day where you would otherwise be open, let’s say a Tuesday, the operators will follow after hours protocols if they received calls on Tuesday instead of following your normal business hour protocols.
Where holidays are individual dates, a Holiday Set is a set of those individual dates. Think of a Holiday Set like a folder that contains all of your holidays. A Holiday Set is created, named, and populated with individual holidays, or off days. For example, you may create a 2022 Holiday Set for your Sales team, which would list all of the days your team has off that year (like December 25th, July 4, etc.). You may also create a separate holiday set for your Customer Service team, who doesn’t share the same holiday schedule as your Sales team. Once a Holiday Set is added and applied to your existing Business Hours set, the call script will automatically adjust based on the parameters you’ve set. Similar to your Closed Between hours within your Business Hours menu, your Holidays will follow your after-hours protocol.
Creating a Holiday Set
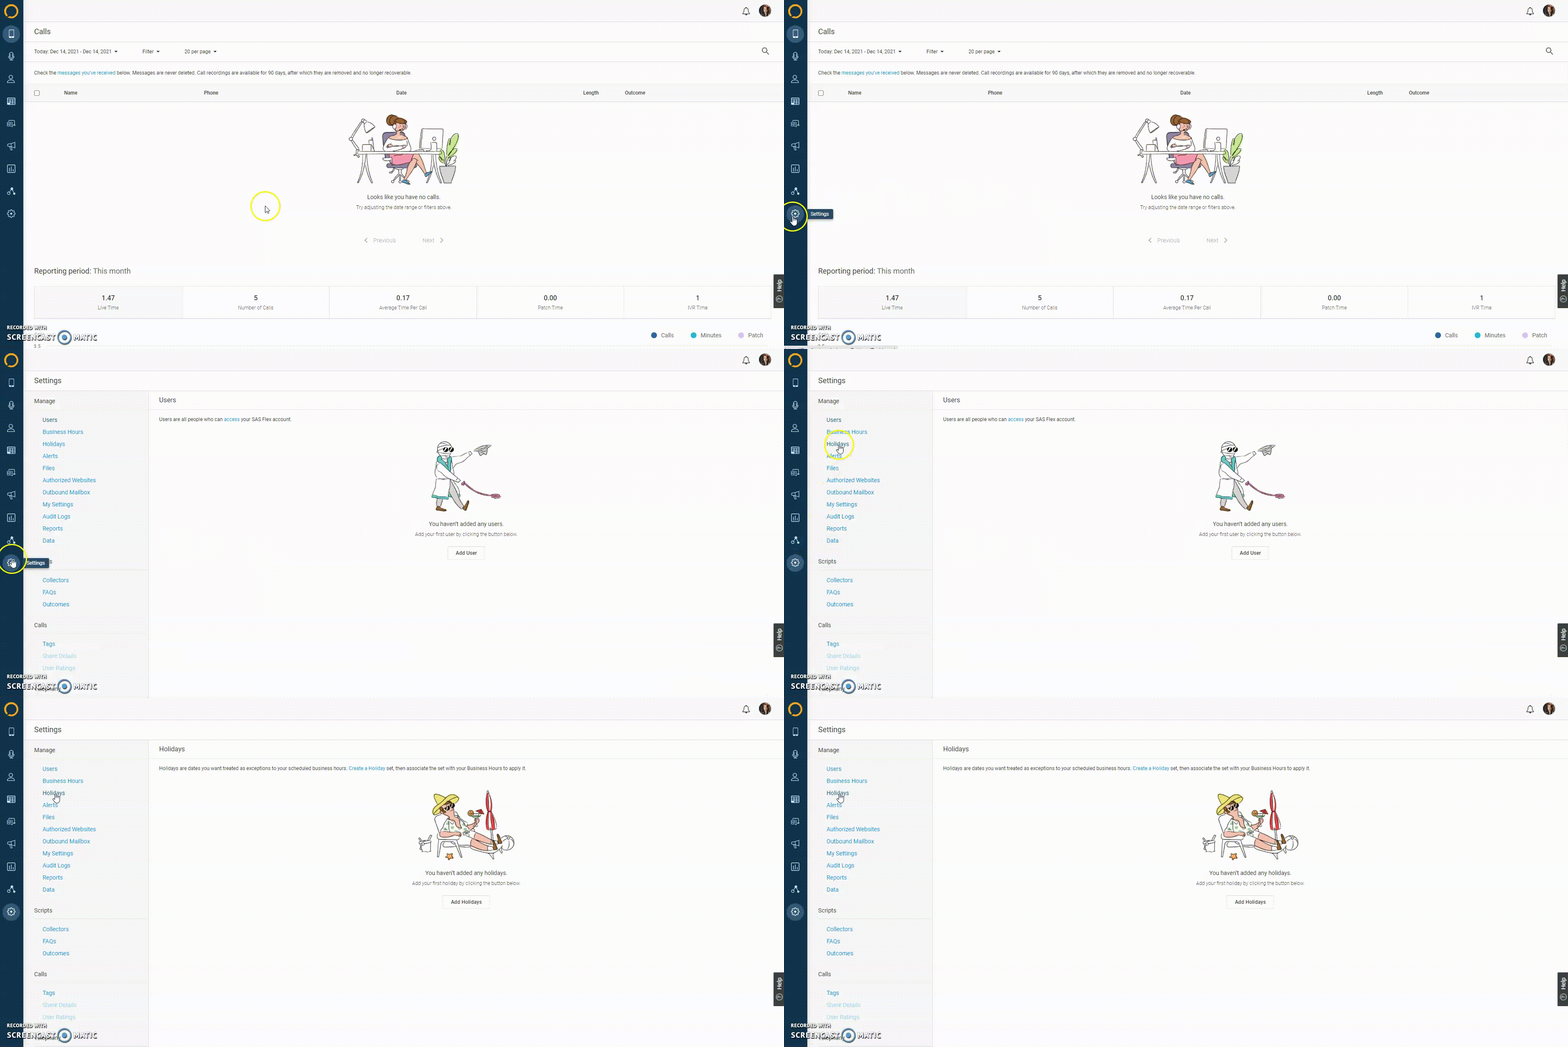
To get started, you will need to access your account Settings by clicking on either your user picture in the upper right-hand corner, or the Gear icon along the left-hand navigation panel. When you’re in your Settings, choose Holidays.
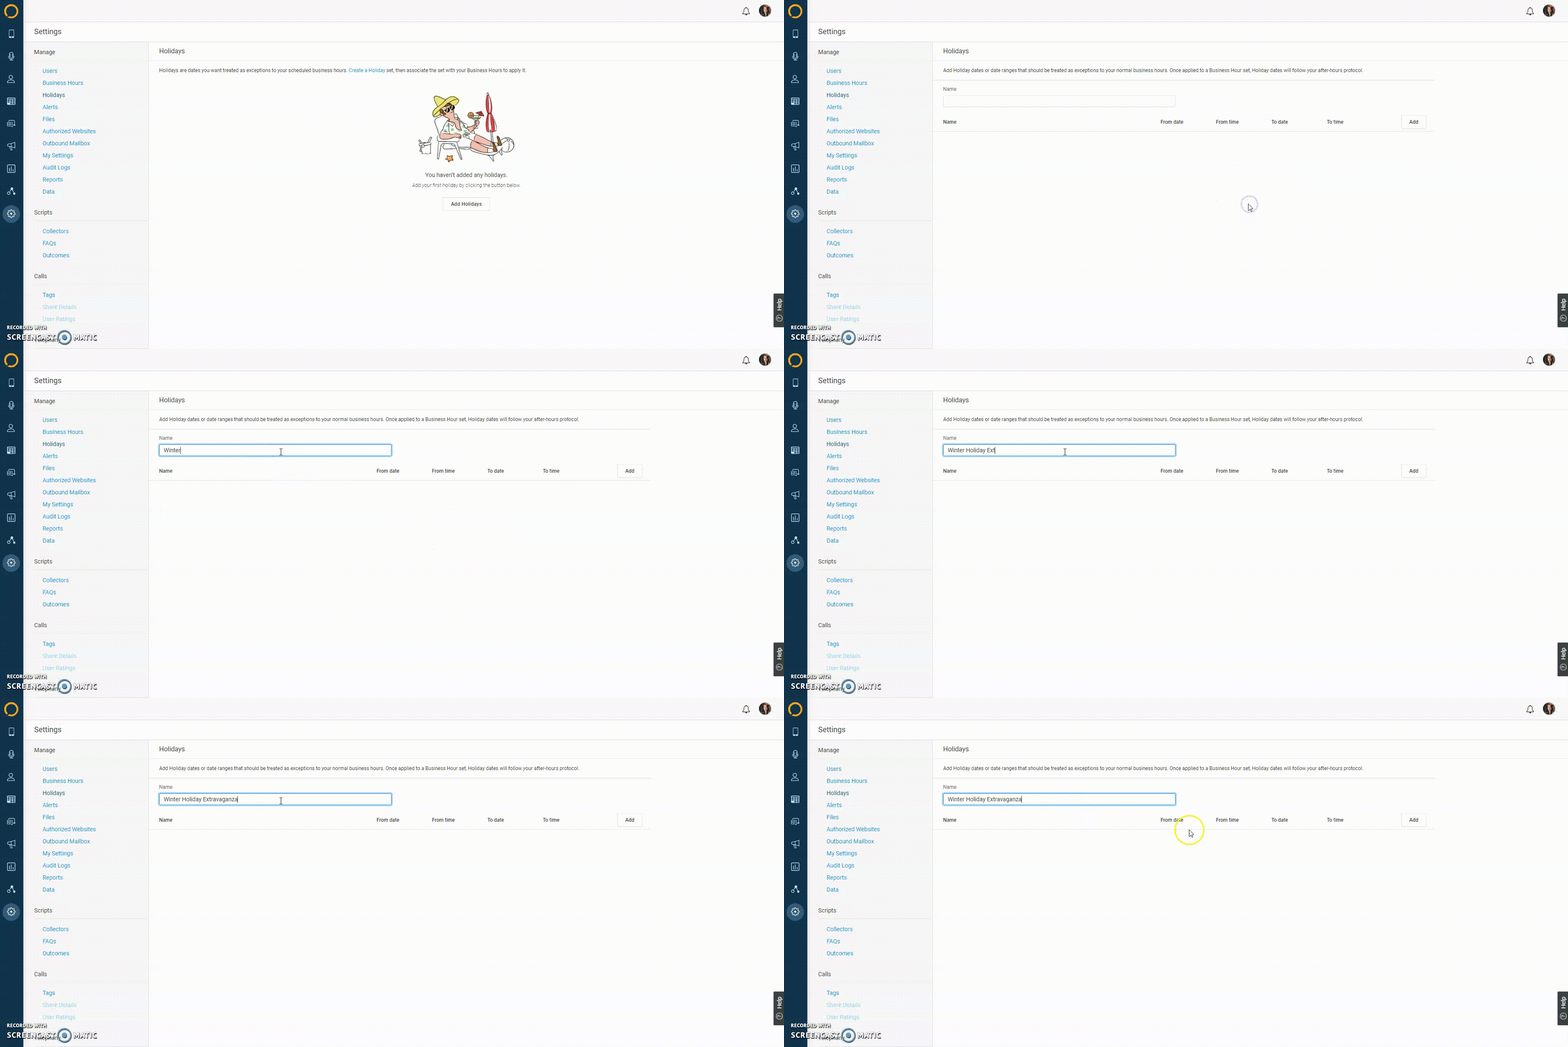
If you don’t have any Holidays yet in your portal, you’ll see a graphic on the screen that will look like the screen below. From this page, click the Add Holidays button and give your Holiday Set a name. We named ours Winter Holiday Extravaganza as we’ll be adding multiple holidays to this one set
Note that if you already have Holidays in your portal, you will not see this graphic. Instead, you’ll see a table of your active Holidays. To create a Holiday from this view, click the Add button in the upper right.
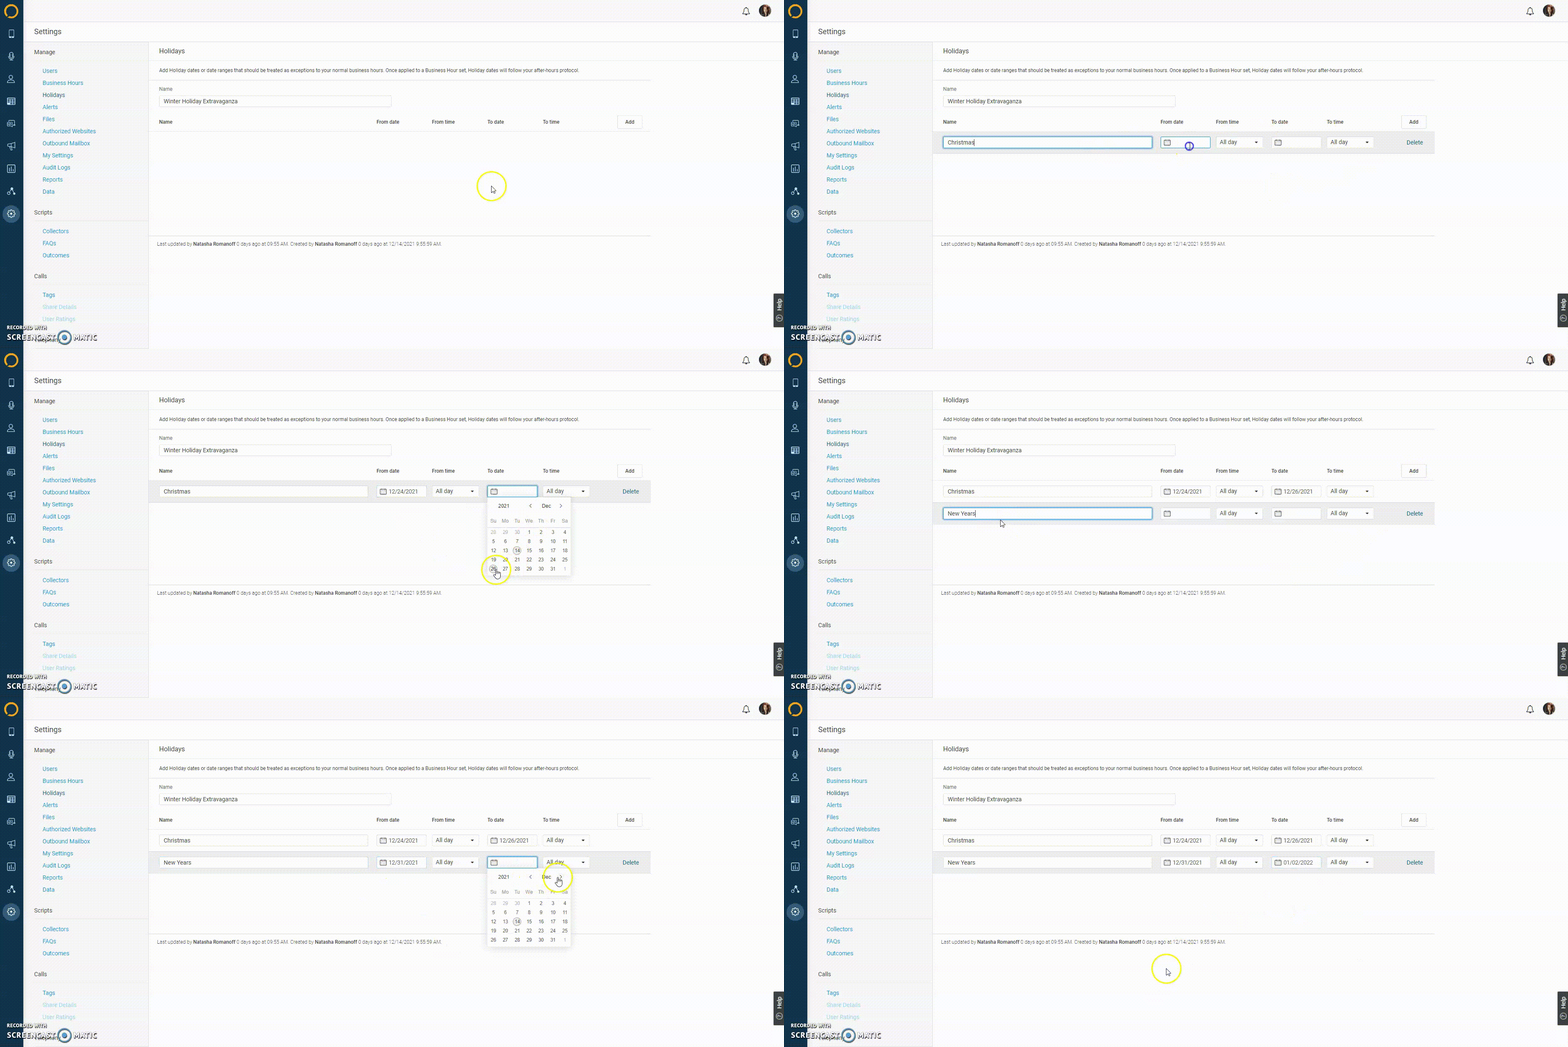
After you’ve named your set, click Add to begin adding the holiday(s) you’d like your business to observe. Once you click Add, you will see another Name field populate. Since you don’t have to create separate Holiday Sets for each holiday you’d like to observe, you can add all of your holidays under one set. In our example, we’ll be adding Christmas and New Years to our Winter Holiday Extravaganza Holiday Set.
When your holidays are added, you’ll need to select the date and time range you wish to apply your Holiday Hours to by filling out the From / To Dates and From / To Times to the right.
When you are finished, click Save.
Applying a Holiday Set to your Business Hours
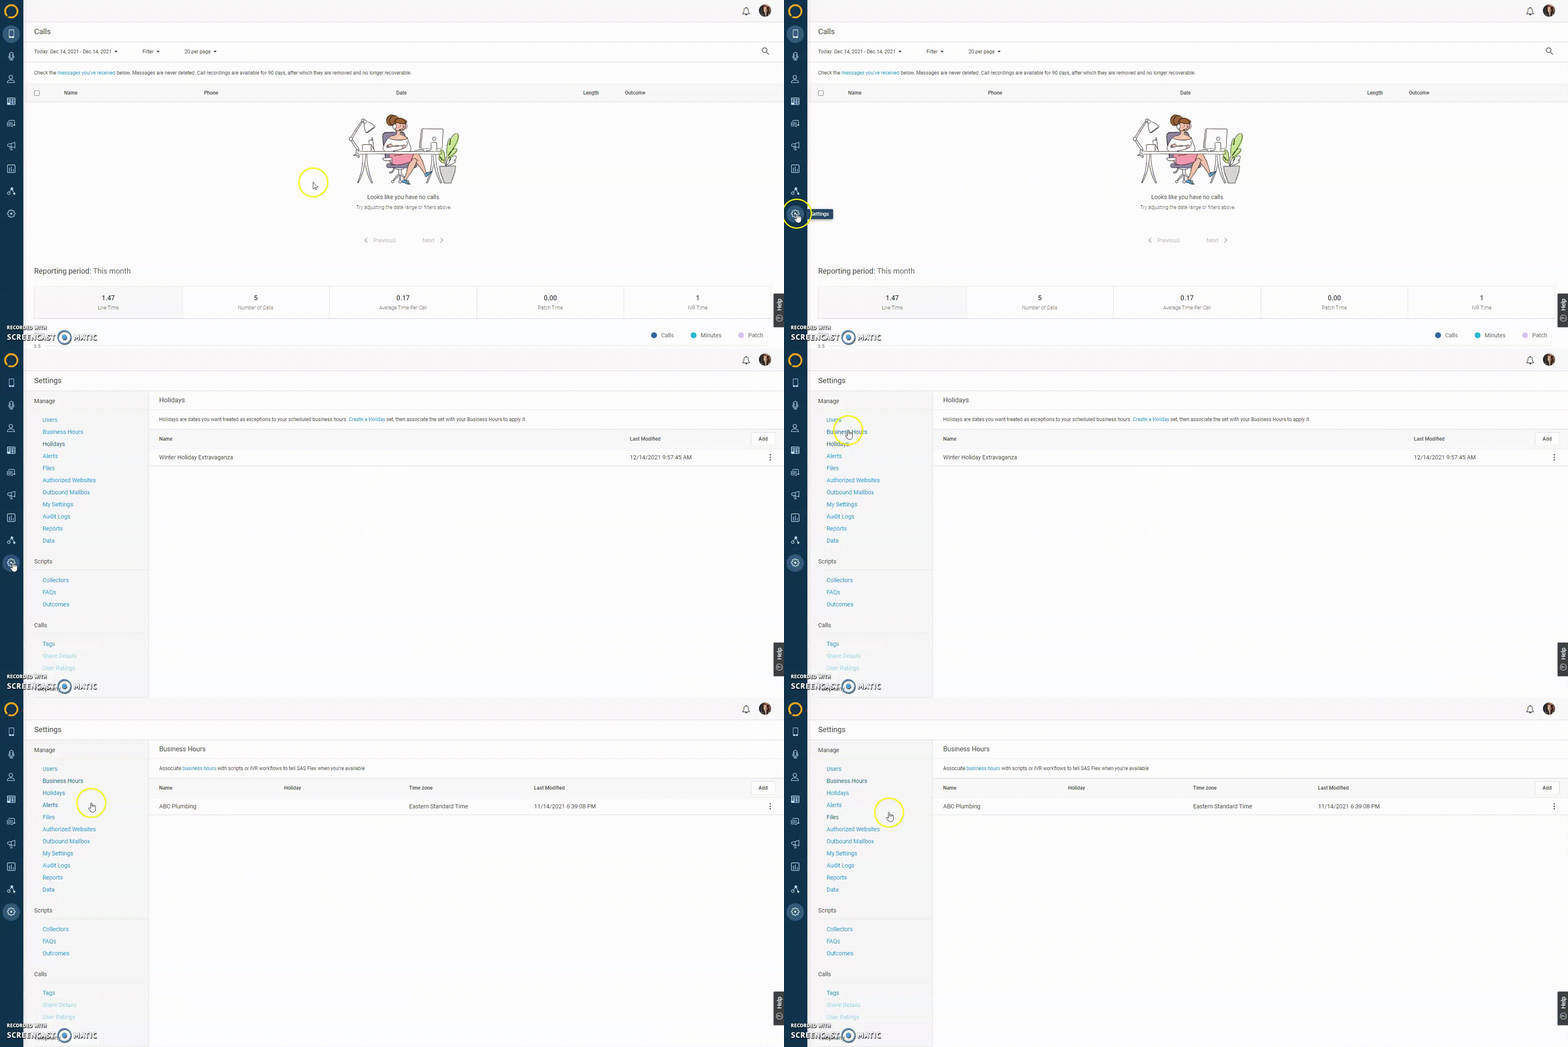
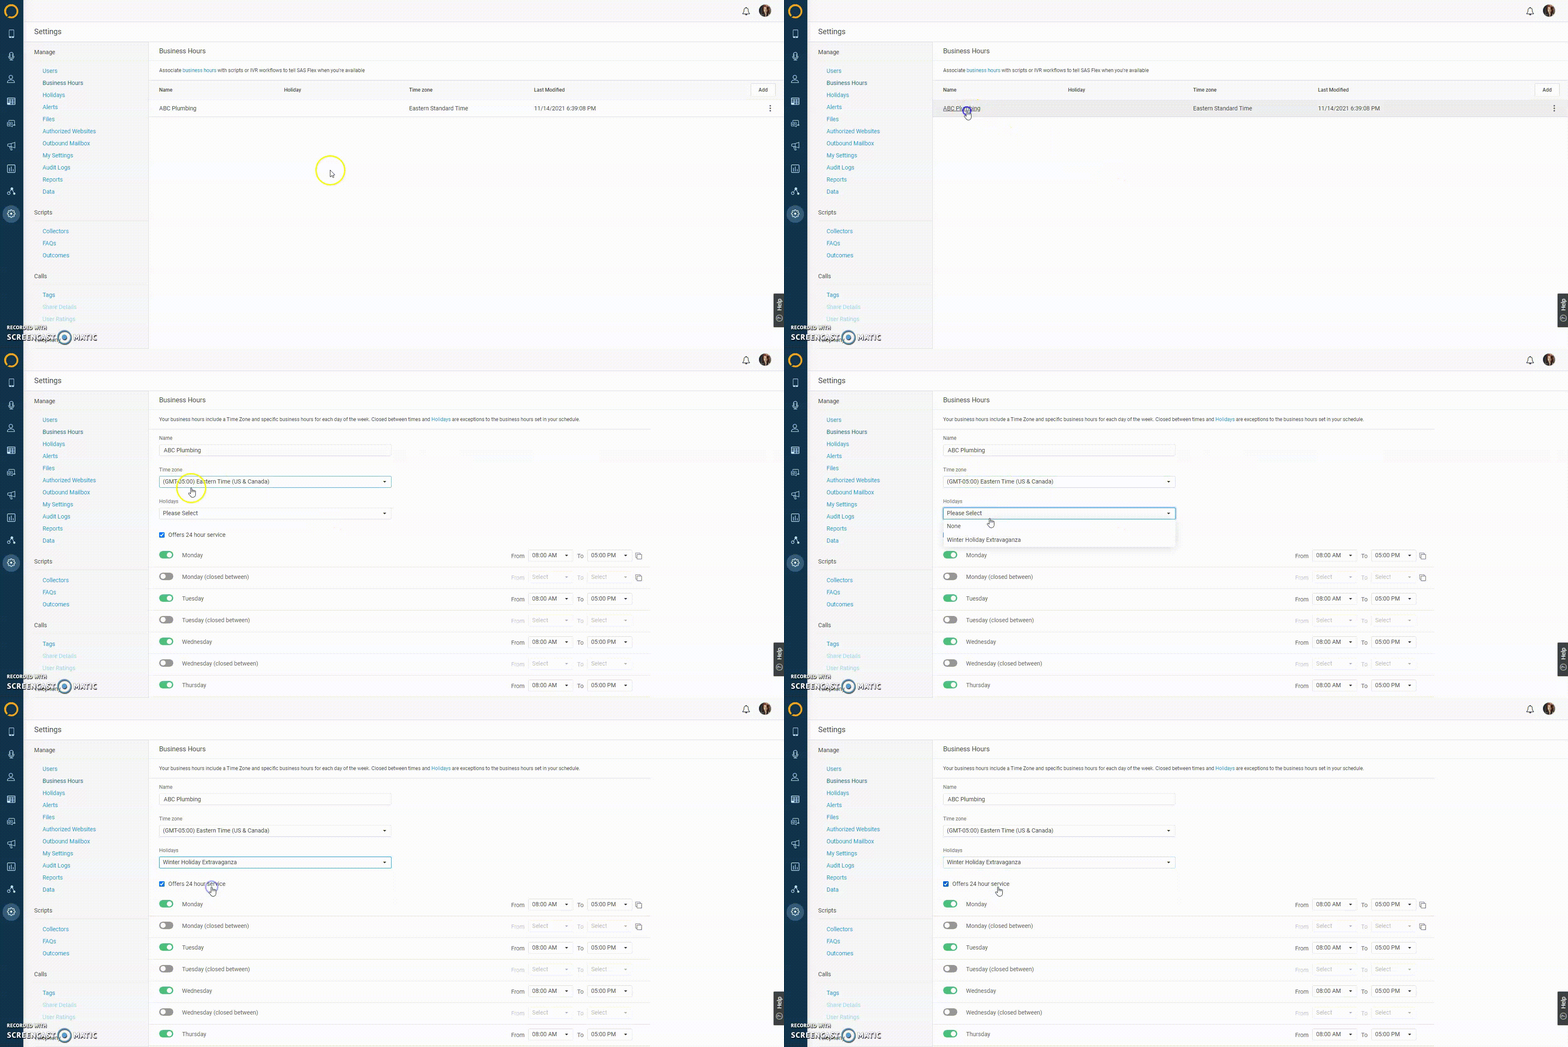
Once you’ve created your Holiday Set, it’s time to apply it to your Business Hours Set. From within your Settings page, select Business Hours on the left-hand side.
On the next page, select the Business Hours you’d like to apply your newly created Holiday Set to. Then, under the Holidays drop down, select your Holiday Set.
When you are finished, click Save.
Adding a Holiday Set to your Greeting
Now that we have created your schedule and attached it to your Business Hours, we need to add this into your script. This first option will allow us to tell the callers that the office is closed without changing the overall flow of the script. Essentially, we will let callers know the office is closed, but we will still handle calls as normal.
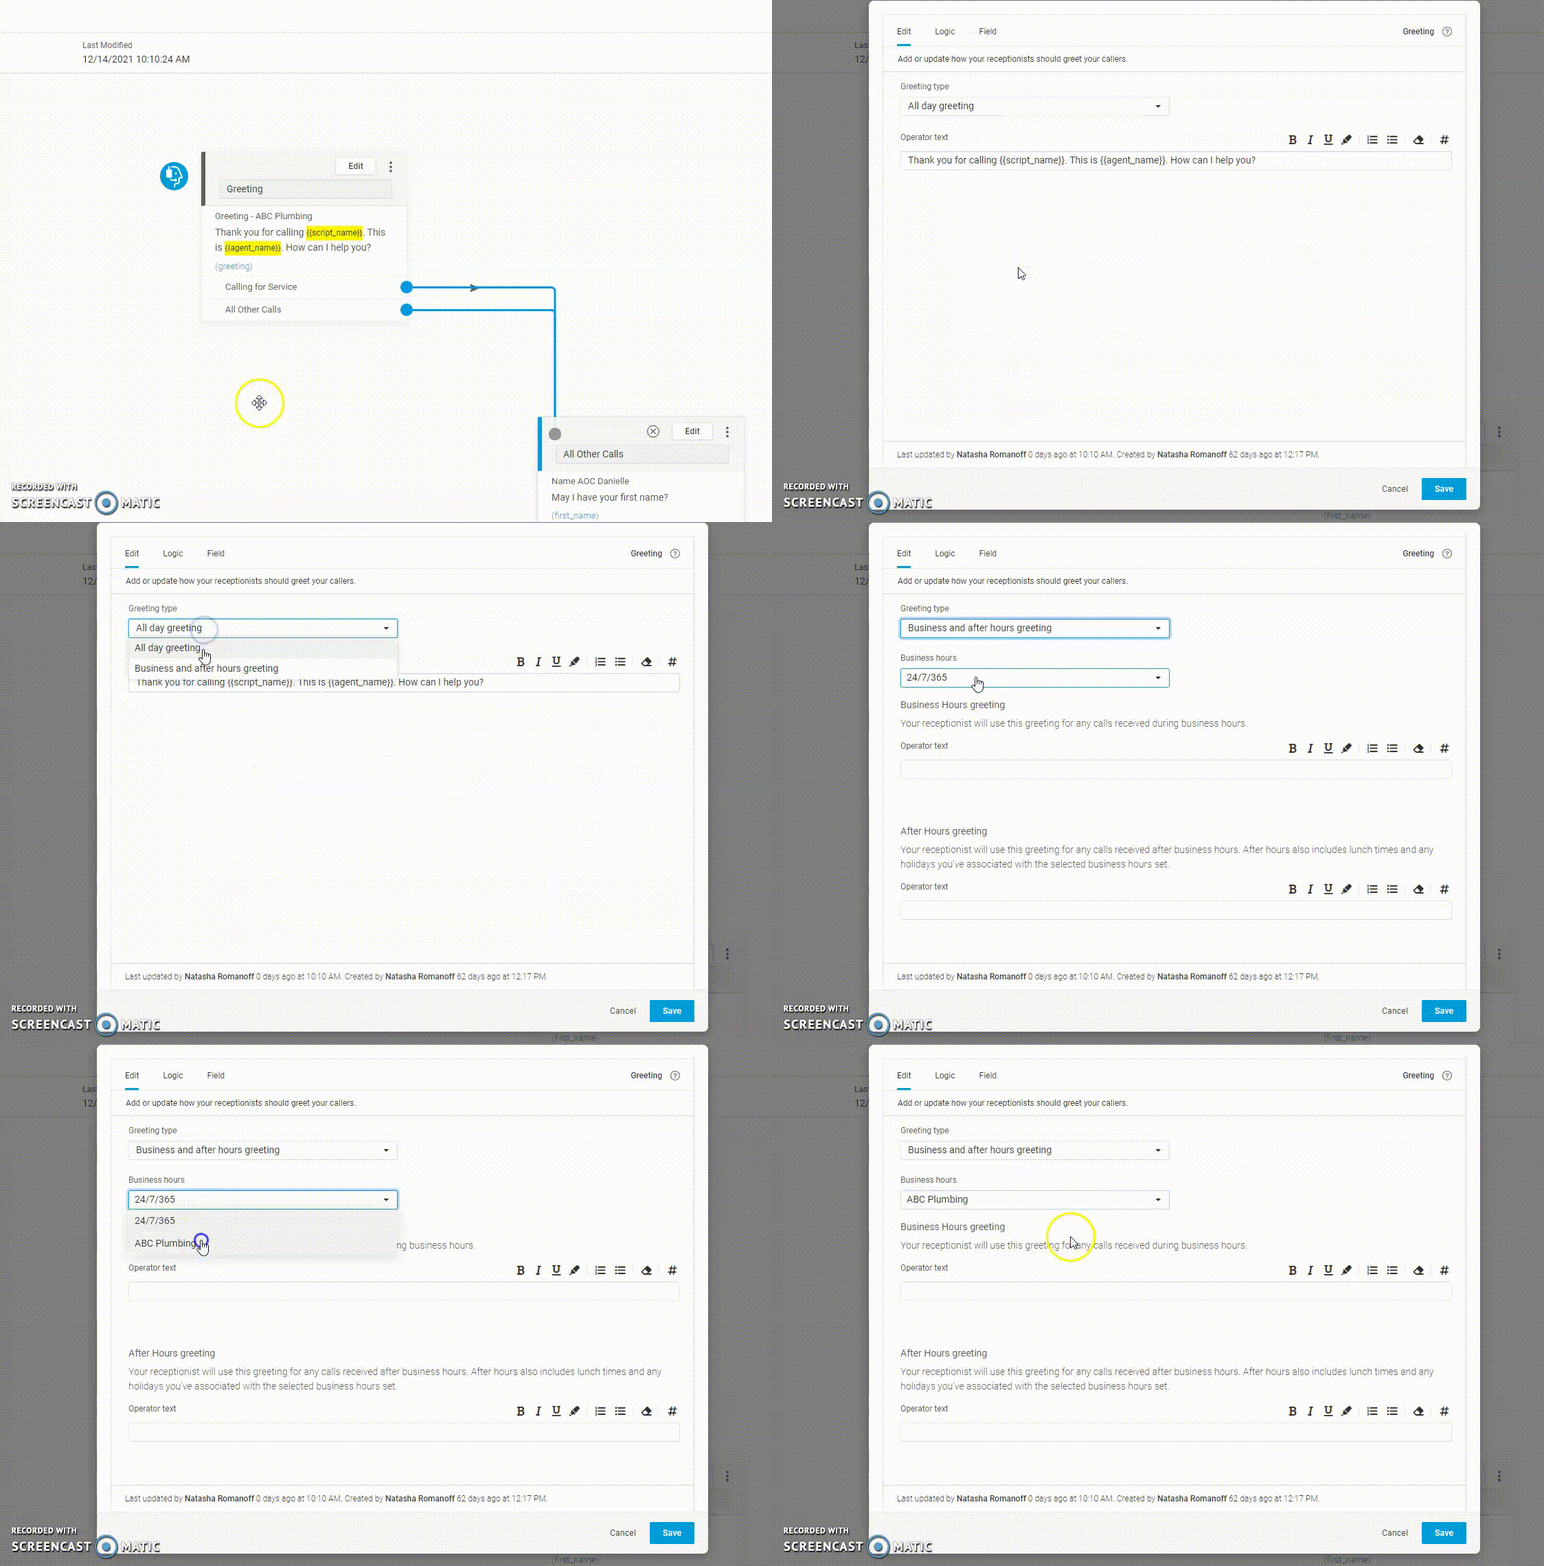
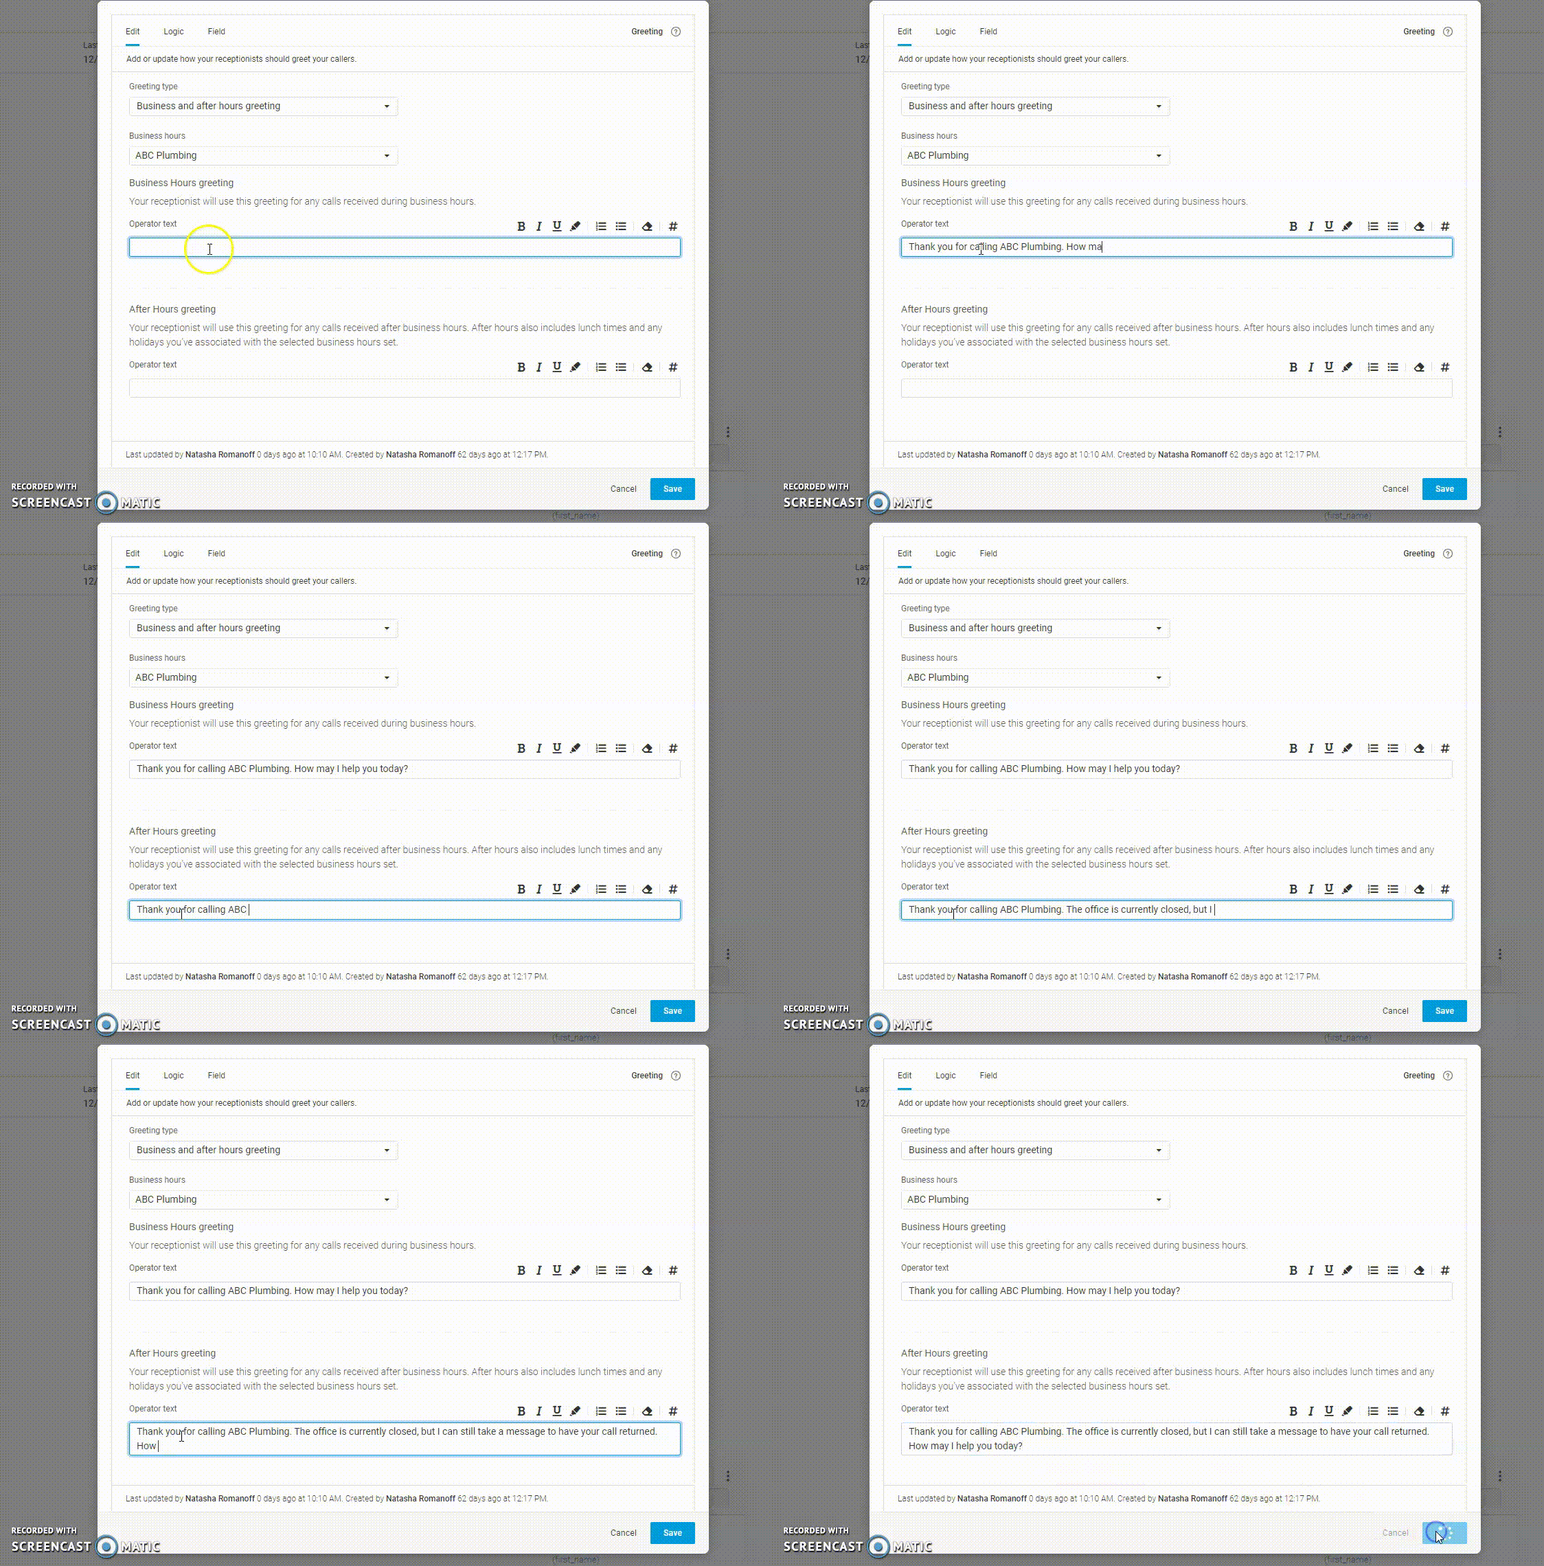
In your Greeting block, under the Edit tab, choose Business and after hours greeting under the Greeting Type drop down. Then, from the Business Hours drop down, select the Business Hours Set you’ve applied your Holiday Set to.
Once you have selected the applicable Business Hours Set from the drop down, it’s time to fill out the operator text for both Business Hours and After Hours (remember, After Hours are determined by the Holiday Set you’ve configured and attached to your Business Hours Set).
When you are finished editing your Greeting block, click Save.
Adding a Holiday Set to your Closing
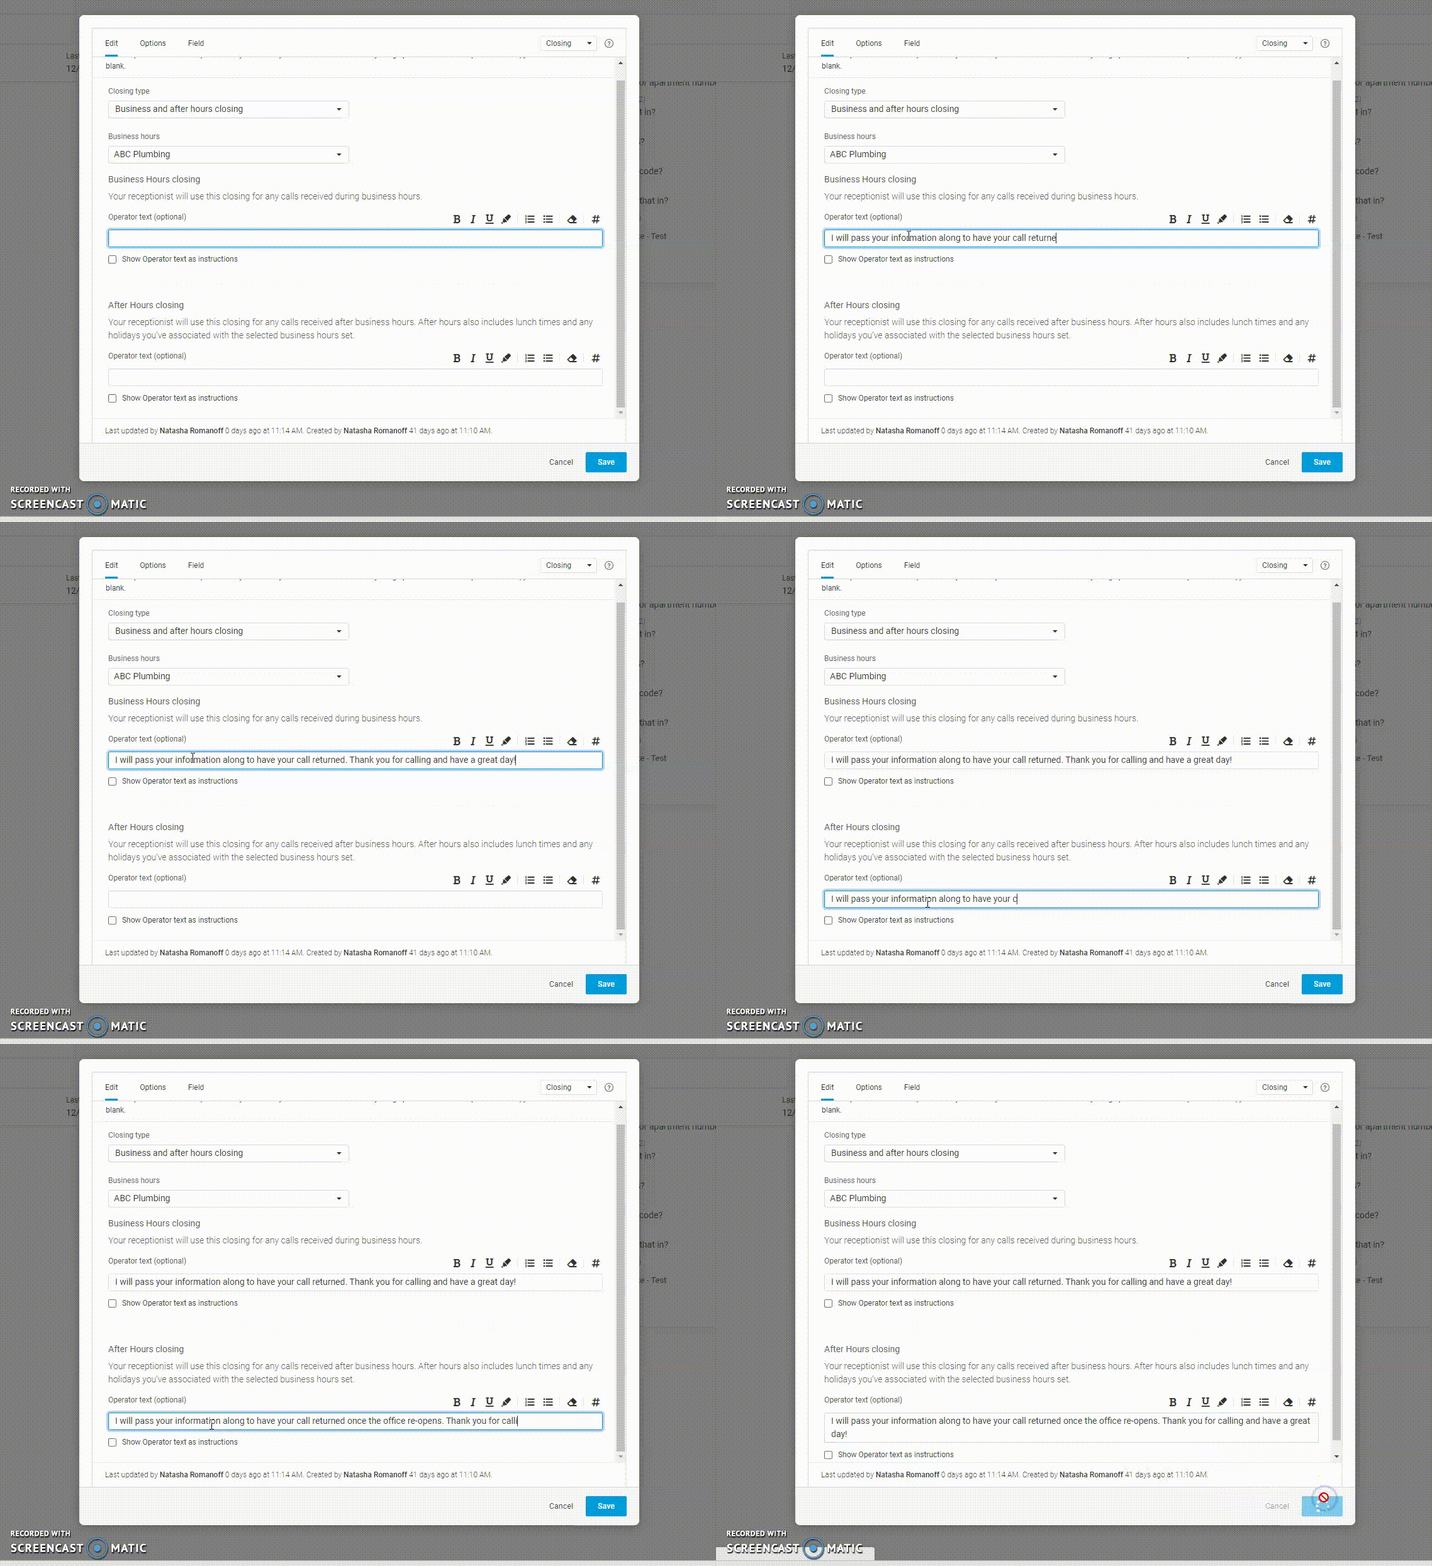
If you want agents to relay a different message during your observed holiday(s) upon closing the call, we’ll need to edit the Closing block(s) of your script.
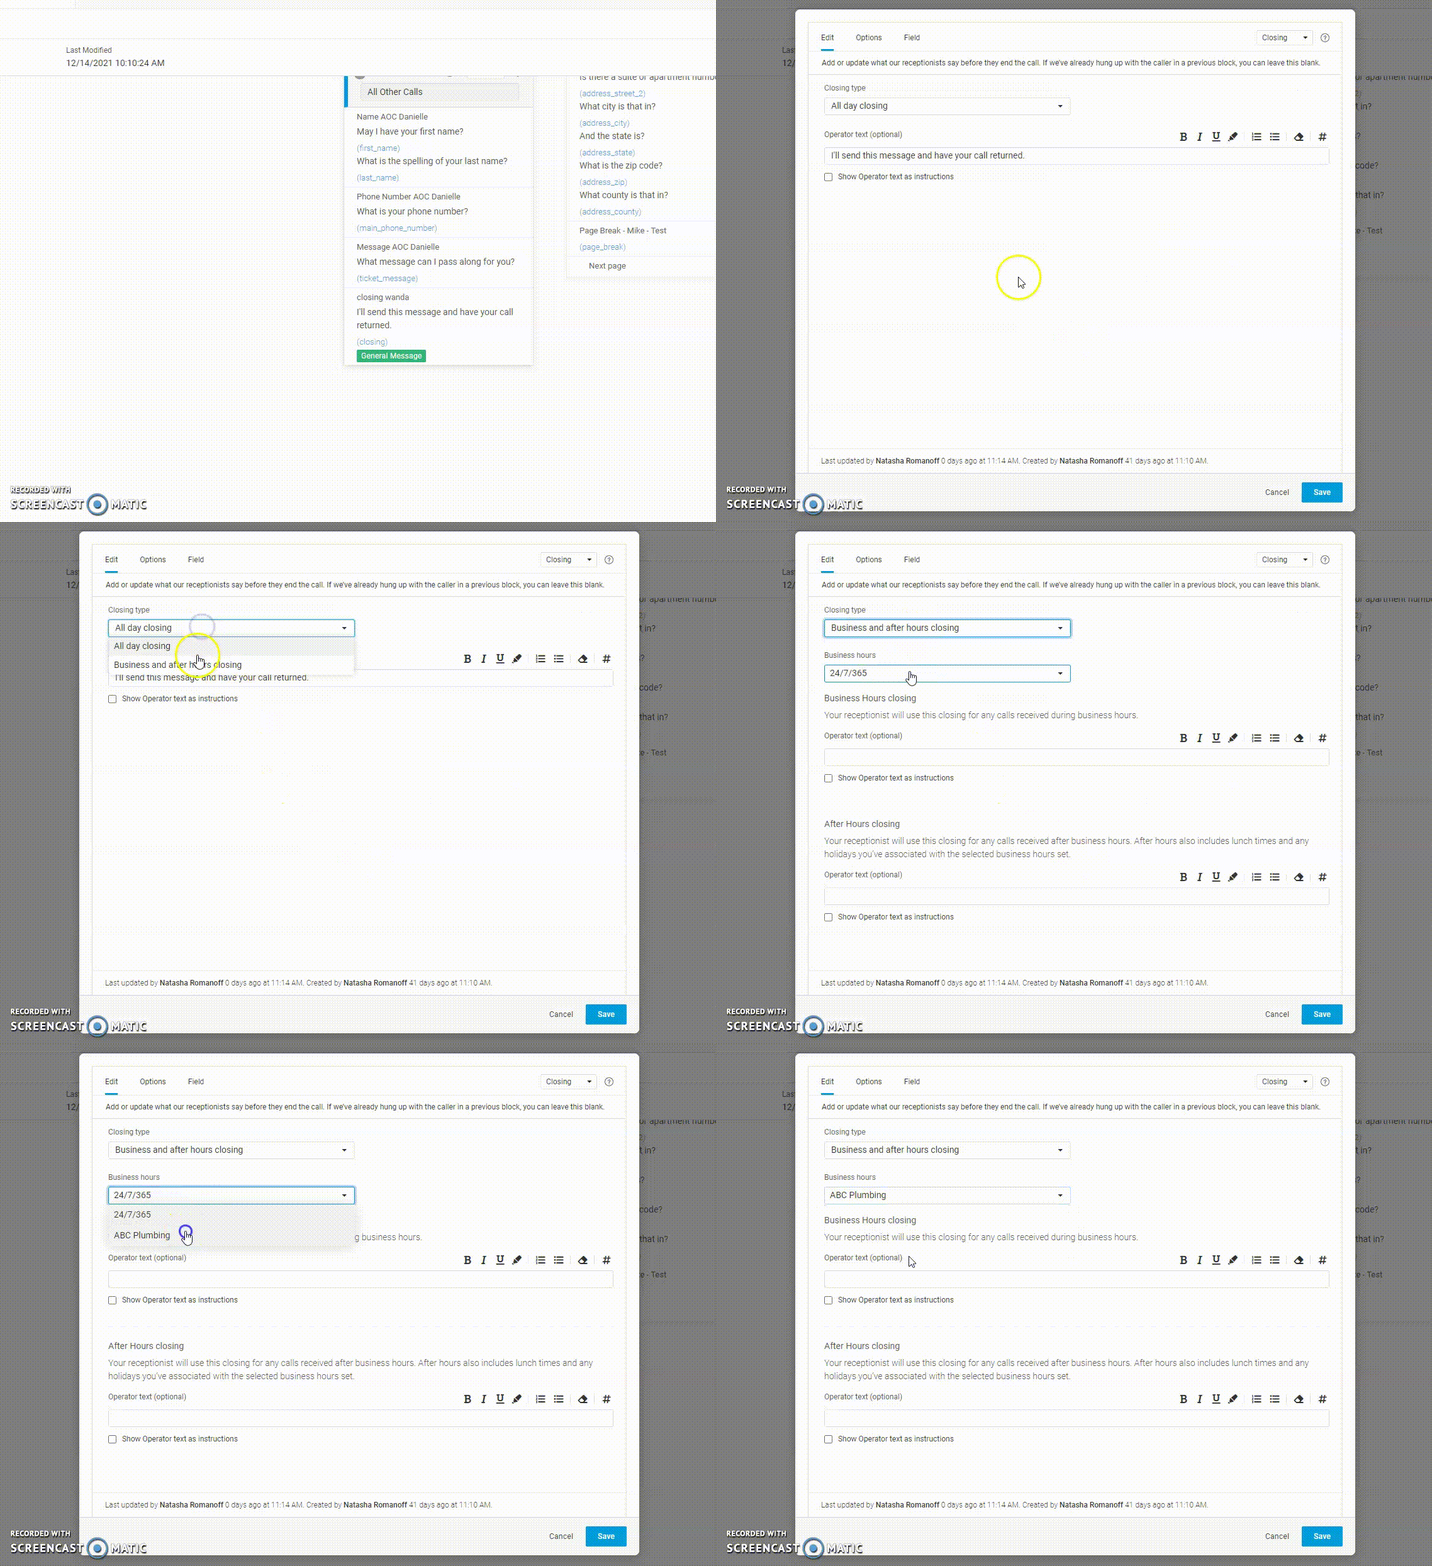
In your Closing block, under the Edit tab, choose Business and after hours closing under the Closing Type drop down. Then, from the Business Hours drop down, select the Business Hours Set you’ve applied your Holiday Set to.
Once you have selected the applicable Business Hours Set from the drop down, it’s time to fill out the operator text for both Business Hours and After Hours (remember, After Hours are determined by the Holiday Set you’ve configured and attached to your Business Hours Set).
When you are finished editing your Closing block, click Save.
How to Change Your Script for the Holiday
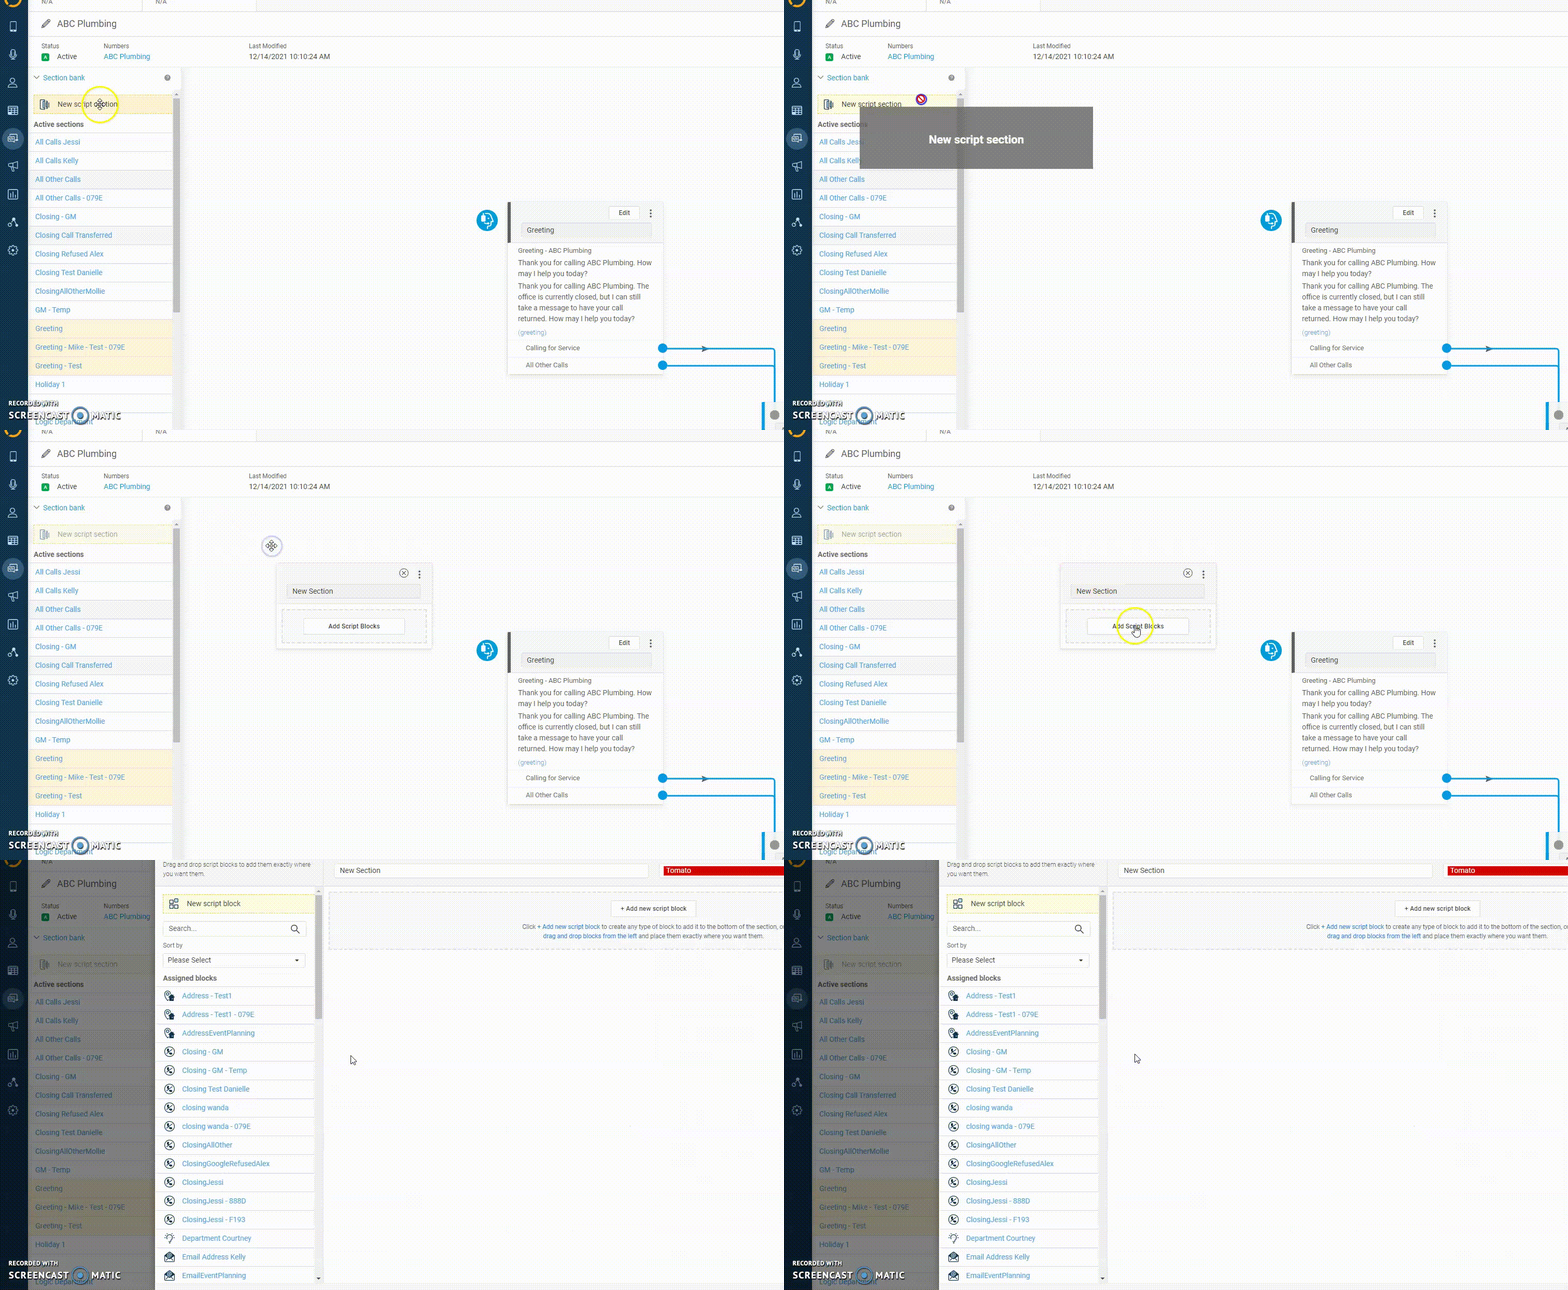
In this section, we are going to show you how you can change the call handling in your script based on a holiday. For example, your script may have agents transferring calls normally throughout the week, but during the holidays you’d like agents just to take a message. To have your script change for a temporary period of time and then return back to normal, we’ll need to add a Workflow (Date Time) Block into your script.
From your Script Workflow page, click New Script Section and drag it out onto the builder. Then, in your New Section box, click Add Script Blocks.
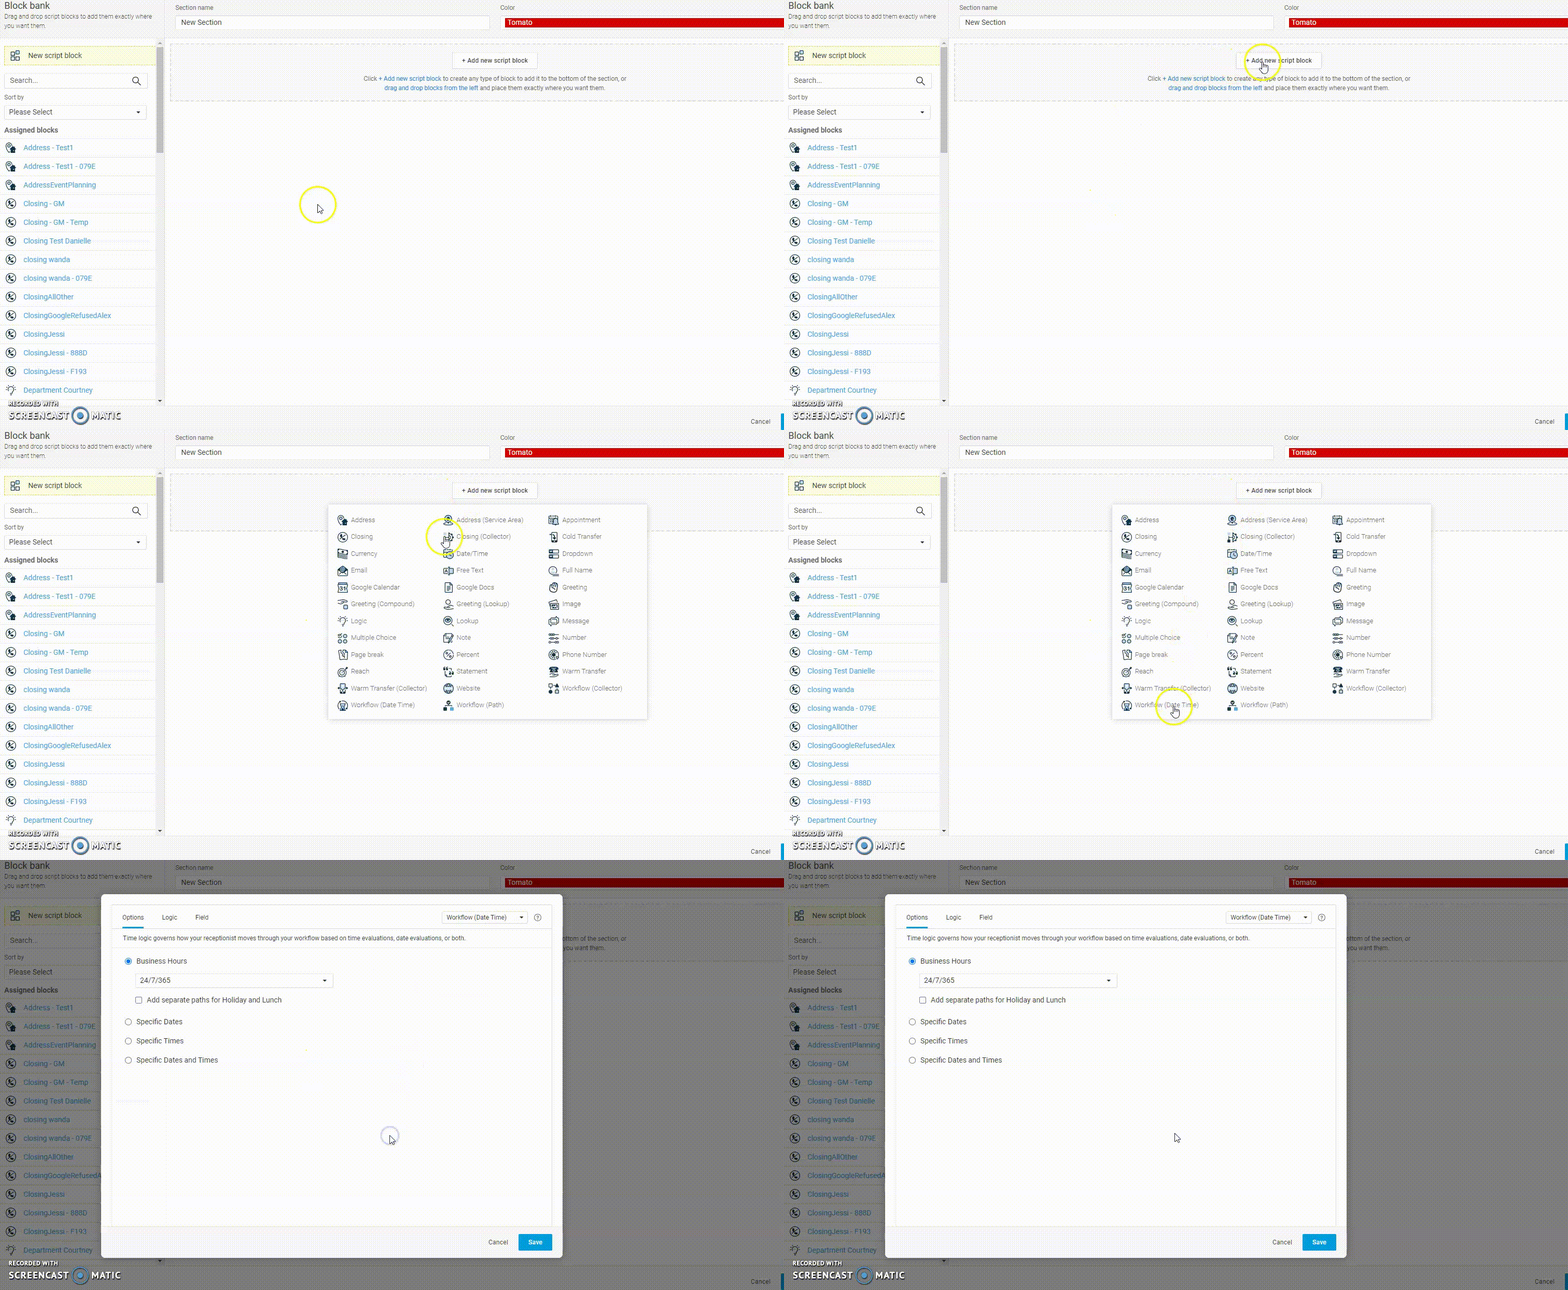
In the pop-up window, click Add new script block. Then choose Workflow (Date Time) from the drop down list.
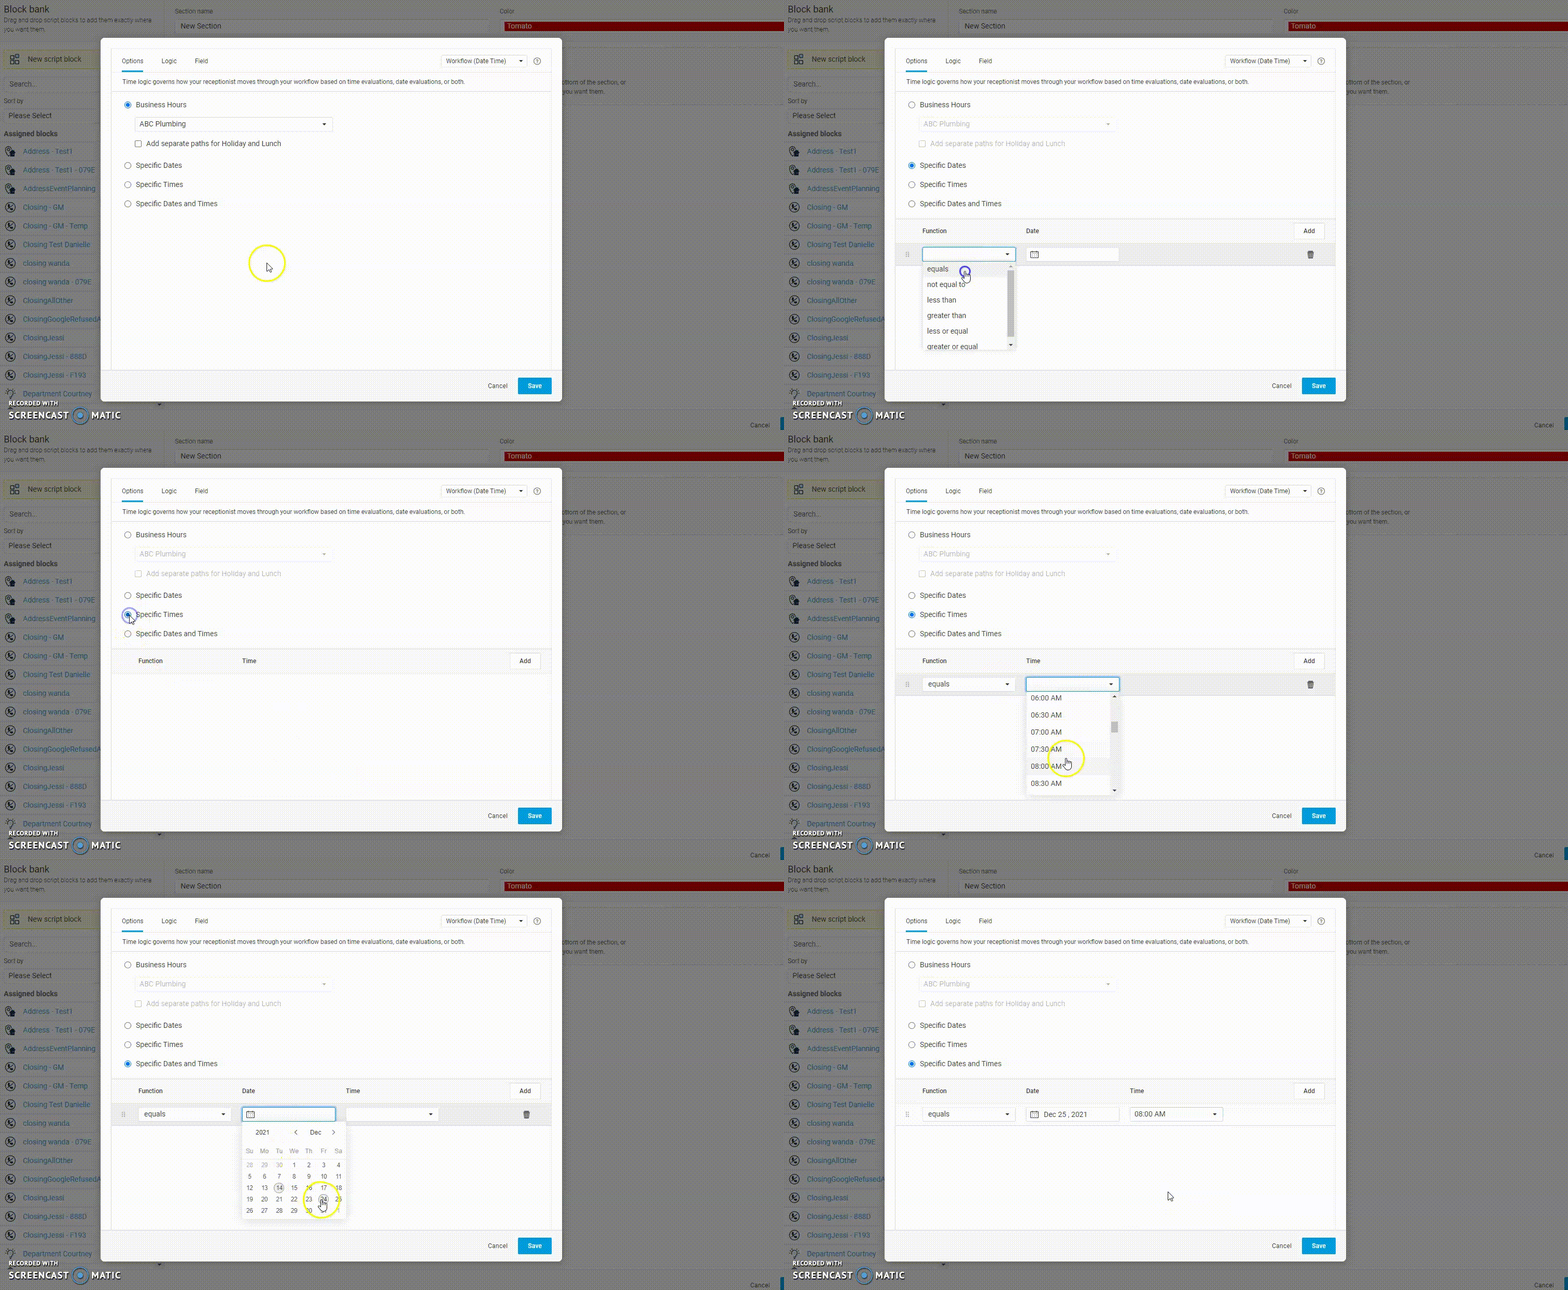
In the Workflow (Date Time) script block, you’ll need to set the days and/or times you’d like to observe as holidays. You can do this in two different ways:
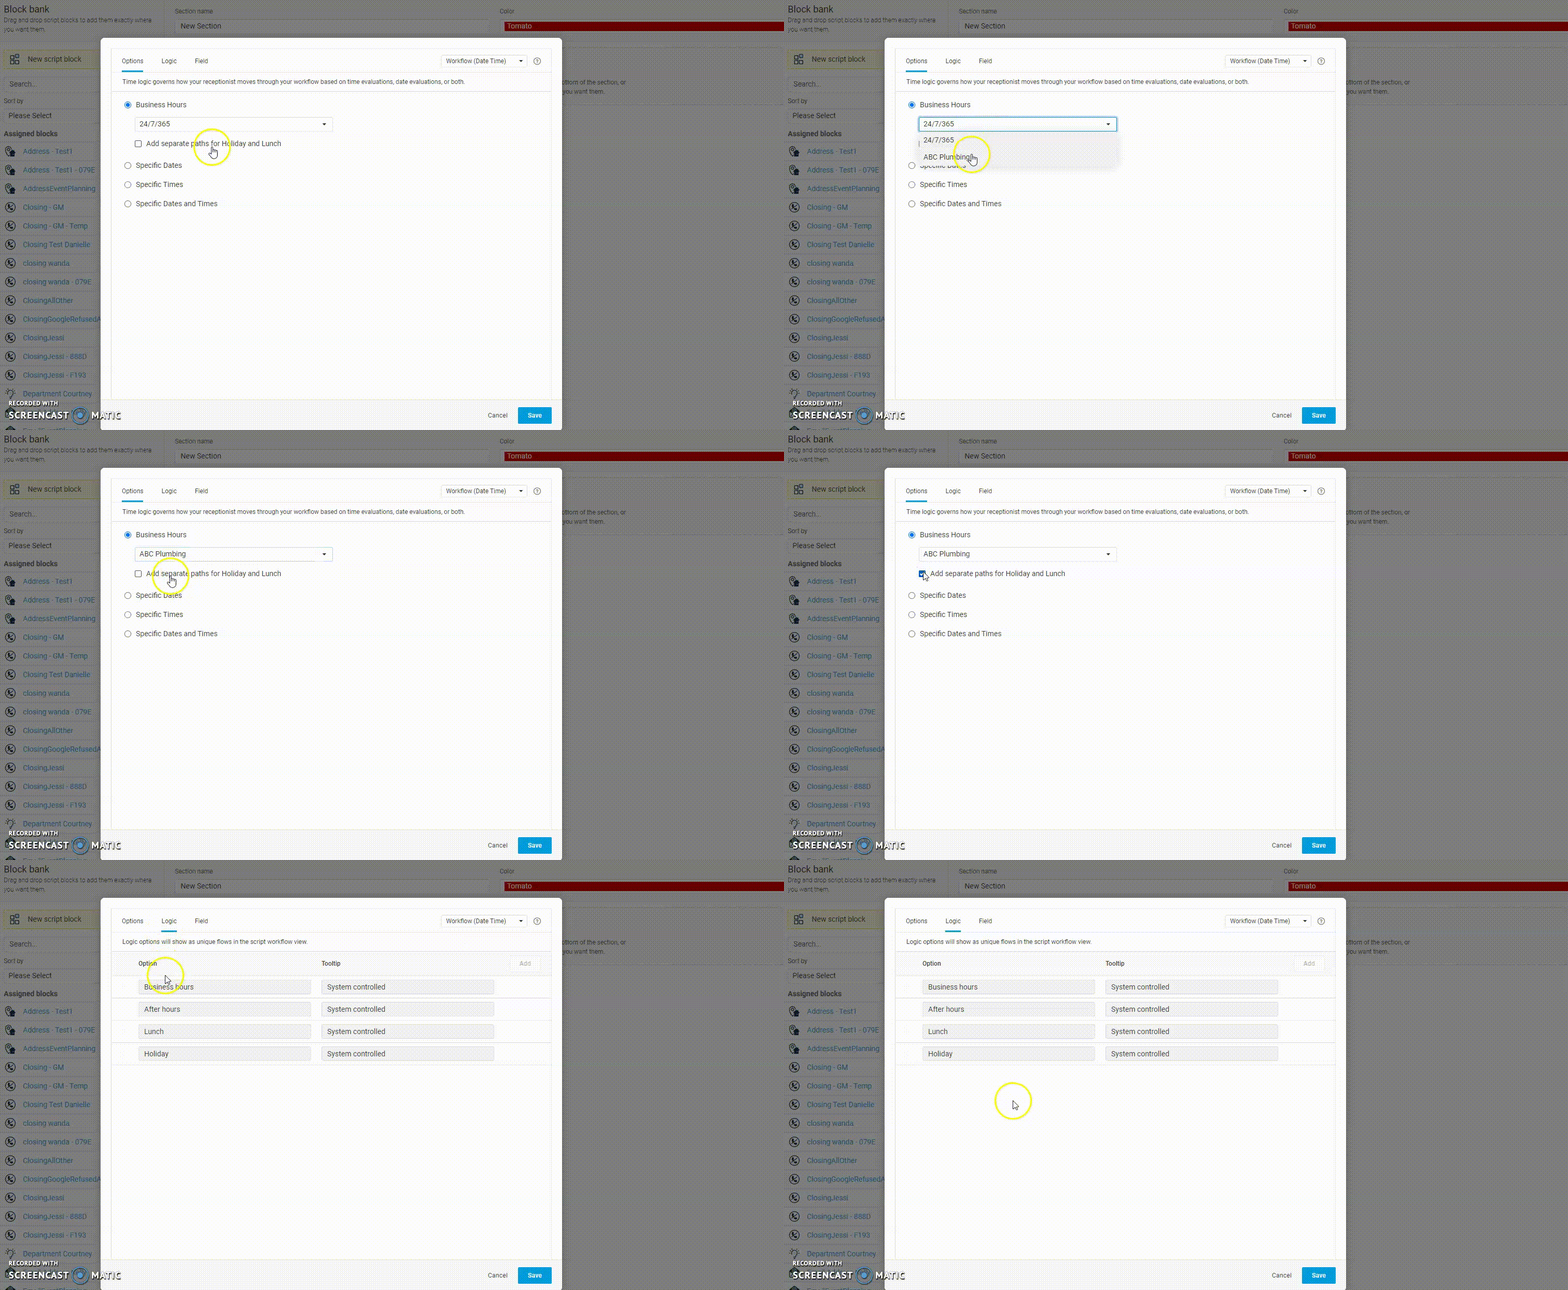
- Choose a Business Hours Set: If you’ve already created a Holiday Set and applied it to your Business Hours Set, choosing your Business Hours from the drop down will be the easiest option. If you choose this option, you can also click the Add separate paths for Holiday and Lunch checkbox, which will add two additional System Controlled Logic Options under the Logic tab
- Choose Specific Dates/Times or Dates and Times: If you haven’t already created a Holiday Set, you can add your specific Holidays right from this block instead. Choose from one of the 3 bulleted options as shown below, then fill in your Holidays accordingly!
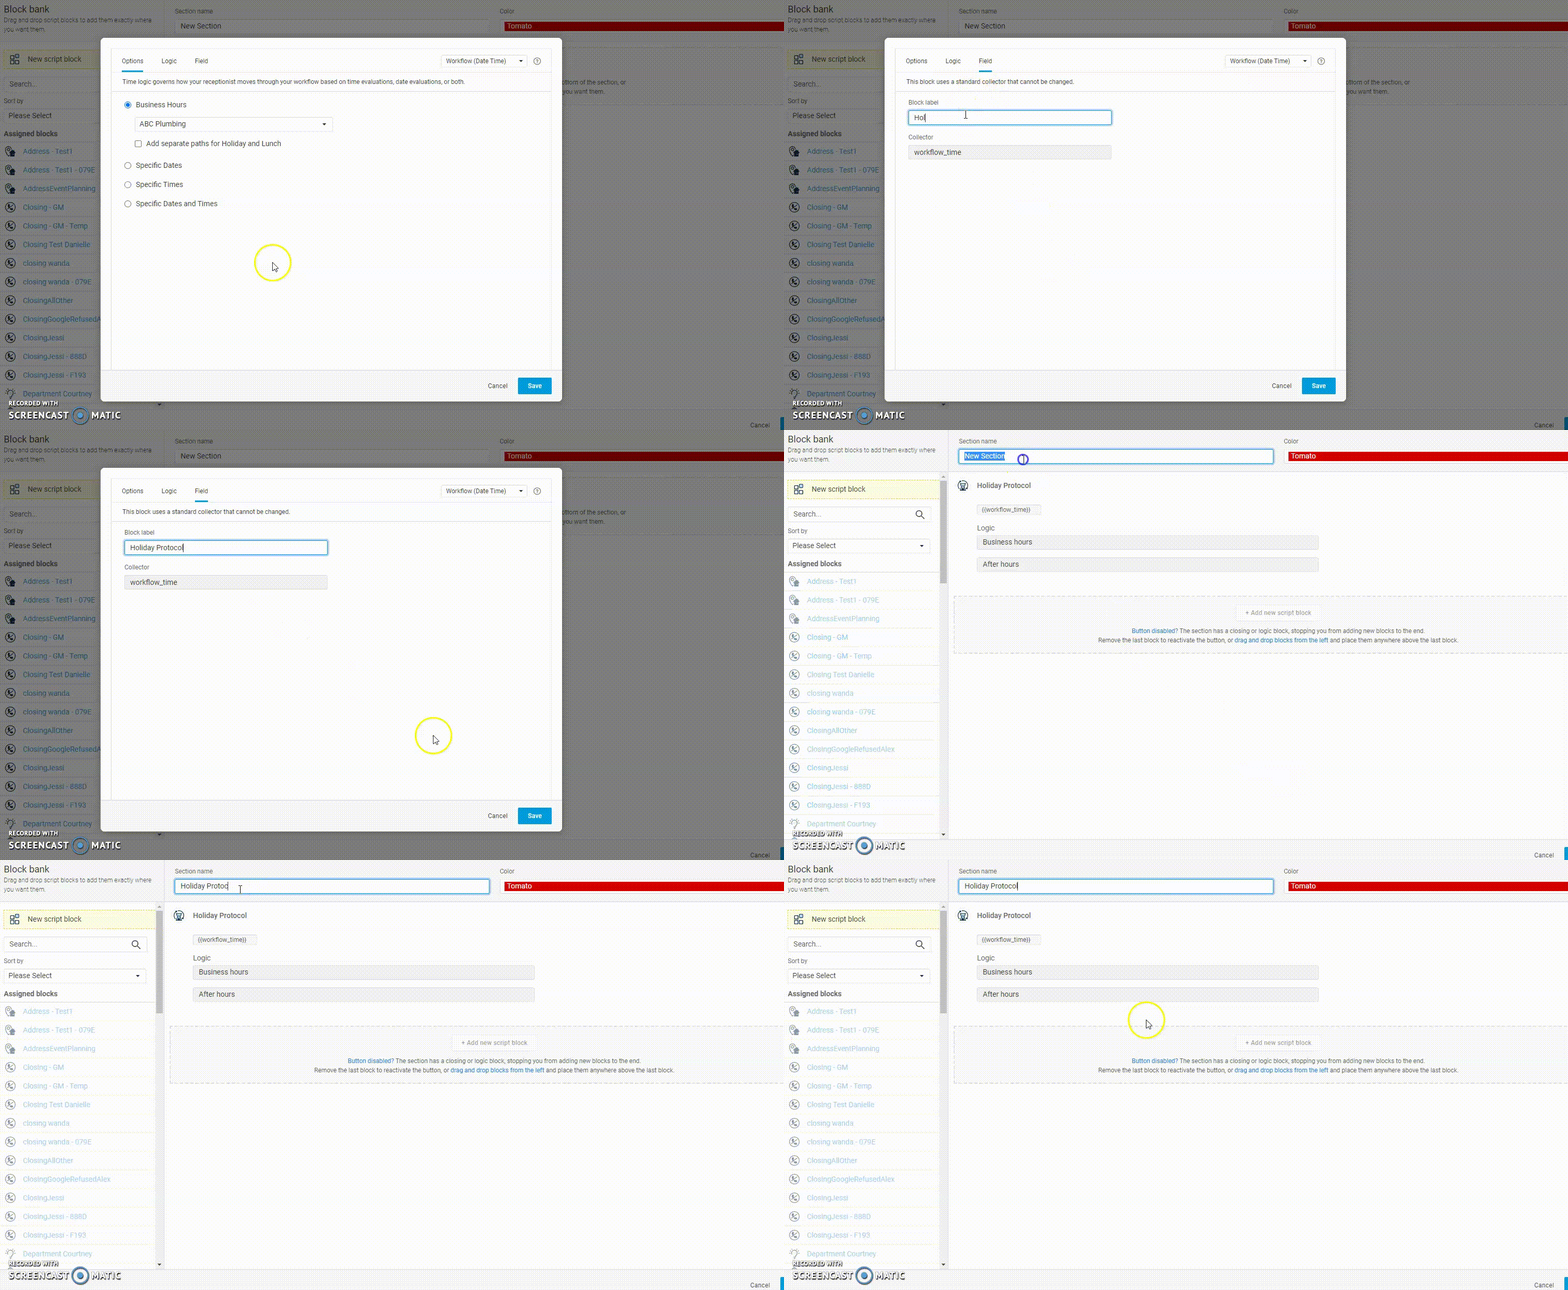
Finish configuring your Workflow (Date Time) block by naming it under the Field tab. Then click Save. Once your script block has been saved, you’ll need to finish configuring your new script section. In this case we’ll just need to name it, then click Save.
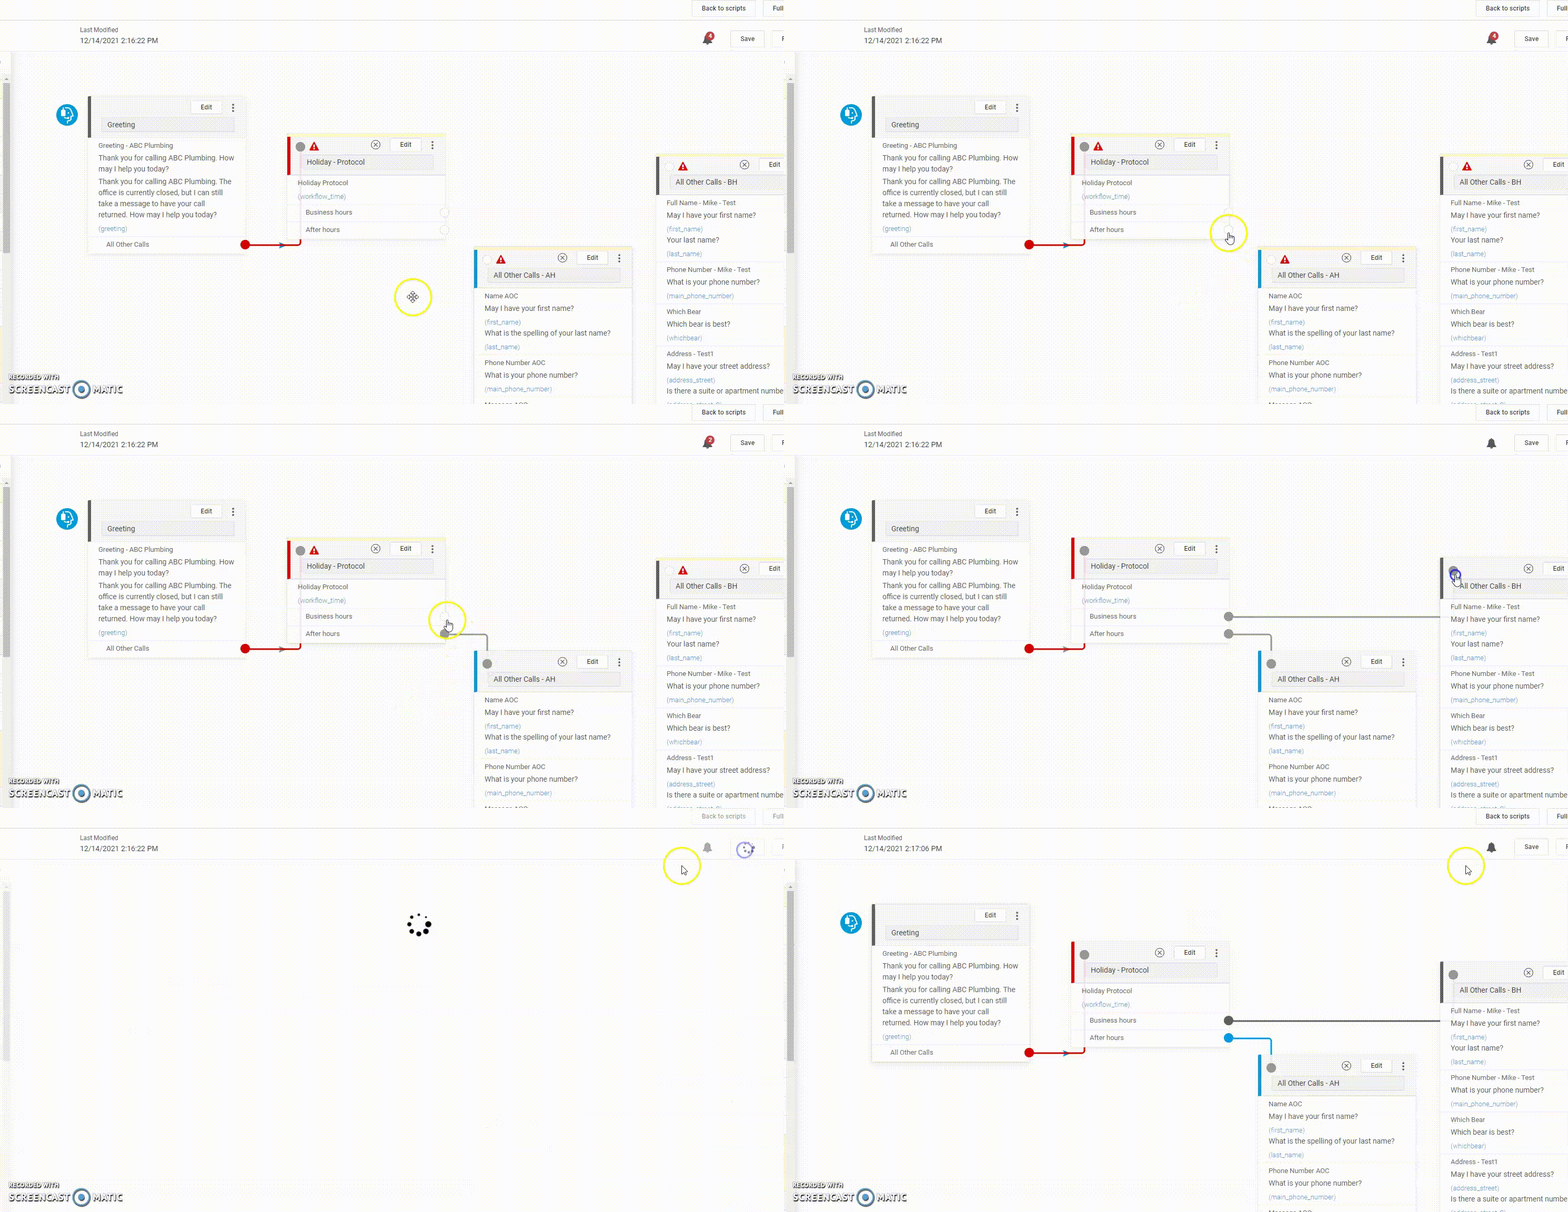
Once your new block and section have been created, you’ll need to link up your new options to their respective paths. If you haven’t already created new sections for your temporary call handling, you’ll need to go back and do that, then finish linking up your sections.
If you don’t feel comfortable making changes to your script yourself, no worries! Feel free to submit update requests to our Customer Support team and they’ll be able to help!
Holidays in Review
Now that you can create your own Holiday schedule and even create your own Holiday Script Update, this will open up a whole new world of possibilities for you; pick up a new hobby, read that one book you keep putting off, or just catch up one some sleep! Just remember these three letters; S-A-S
- Select your Holiday
- Add your Holiday
- Save your Holiday
Happy holidays from your SAS family!
Categories
- Advice (32)
- Answering Service 101 (18)
- Best Practices (10)
- Call Center Jobs (6)
- Call Center Software (20)
- Comparison (2)
- Customer Service (30)
- Funny (31)
- Holidays (19)
- Industry Hacks (19)
- Infographics (53)
- International (1)
- Medical (8)
- News (12)
- Phone Etiquette (2)
- Phones (14)
- Pricing (8)
- Quizzes (3)
- Receptionist (11)
- SAS Products (29)
- Scripting (4)
- Services (5)
- Small Business (25)
- Starting Up (7)
- Tips and Tricks (19)
- Uncategorized (1)
- Videos (19)
- Workplace (6)
Recently writen
- Call Center Script Best Practices: Advanced Script Block Tips to Optimize Your Answering Service
- January 2025 Release Notes – Adjustments to Call Details Timeline, New Scripting Updates, Live Transcription, and more!
- April 2024 Release Notes – Voicemail Greetings, Ability to Access Websites With a Username and Password, and more!
- March 2024 Release Notes – New Add-On, Settings Revamp, and more!
Follow Us
How about a demo?
We'll show you how our web portal works and answer any questions you have about SAS.
Schedule a demo


